How to Create and Mint an NFT using Filebase + Alchemy

Alchemy Users may receive their first 1TB of storage (for your first month) free on Filebase - Using code "WEB3WELCOME" - Sign-up to Filebase!
NFTs, or ‘non-fungible tokens’ are crypto assets with varying values and attributes. NFTs can be anything from digital art, to music or pieces of writing. NFTs have associated metadata with them which includes a unique token that acts as a certificate of authenticity for the NFT. This token can be used for authentication similar to access and secret key pairs.
NFTs can be made by anyone, and ‘minted,’ or created and sold on blockchain networks, in exchange for cryptocurrency. The value of NFTs depends on a wide variety of factors, including crypto price, collection marketing and investors, and the NFT community.
In this guide, we’ll take an image file stored on Filebase, a decentralized storage provider, and use Alchemy, a blockchain development platform, to mint NFTs on the Ethereum blockchain.
Let’s get started!
1. First, we need an image to use as an NFT. We’ll start by uploading an image to Filebase for us to use.
To do this, navigate to console.filebase.com. If you don’t have an account already, sign up, then log in.
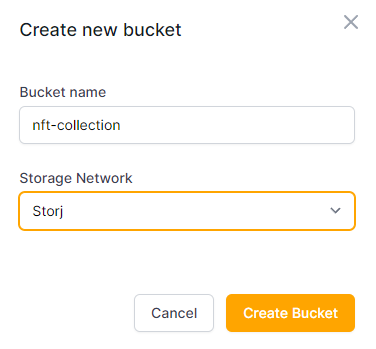
2. Select ‘Buckets’ from the left side bar menu, or navigate to console.filebase.com/buckets.
Select ‘Create Bucket’ in the top right corner to create a new bucket for your NFTs.

3. Enter a bucket name and choose the storage network to create the bucket on.
In this guide, we’re calling the bucket nft-collection, and using the Storj network.
❗ Bucket names must be unique across all Filebase users, be between 3 and 63 characters long, and can contain only lowercase characters, numbers, and dashes.
4. By default, this bucket is private. Set this bucket to be ‘public’ by using the toggle button.

5. Next, select the bucket from your list of buckets, then select ‘Upload’ in the top right corner to upload an image file.
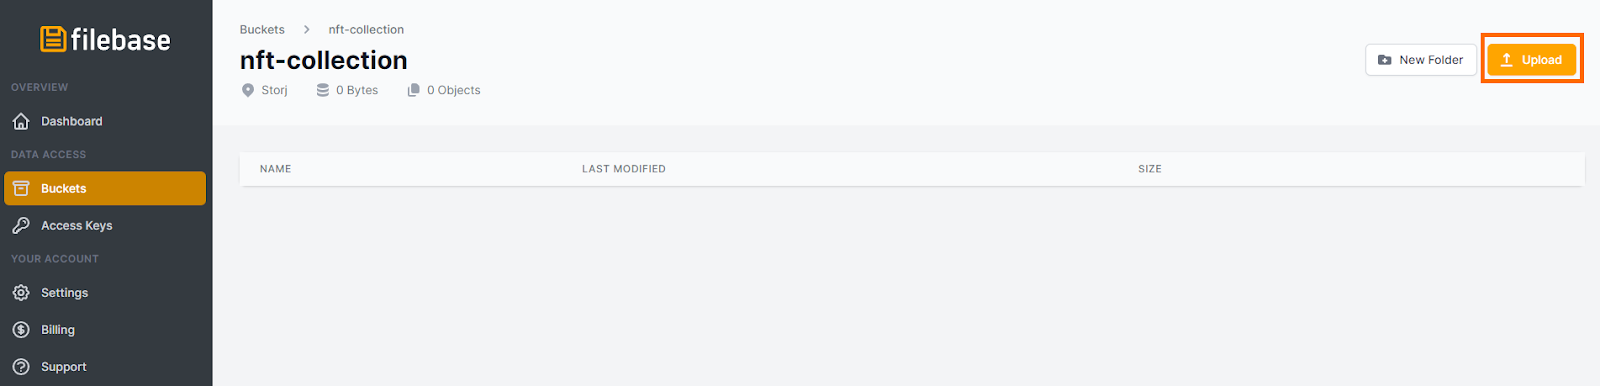
6. Select an image to be uploaded.
Once uploaded, it will be listed in the bucket.

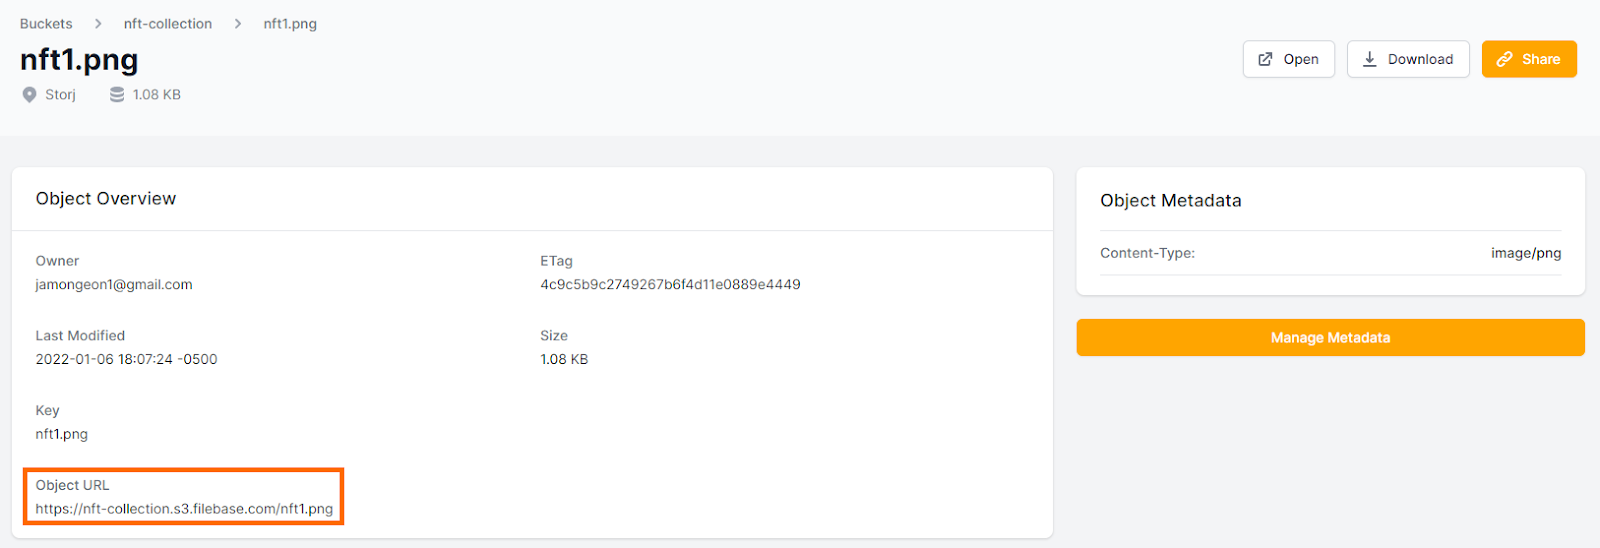
7. Click on your uploaded object to display the metadata for the object.
Take note of the Object URL. We will reference this later.
8. Now, let’s head over to Alchemy and either sign up for an account or login.
9. From the Alchemy dashboard, we need to create an app.
Select the ‘Create App’ button to get started.

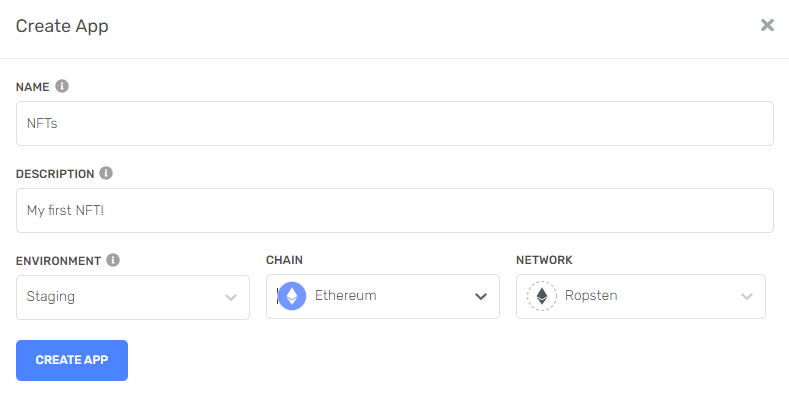
10. Create a new app. For our example, we called our app NFTs.
Set the environment to ‘Staging’, the chain to ‘Ethereum’, and the network to ‘Ropsten’.
11. Next, we need an Ethereum wallet.
For this, we’ll need a Metamask account. You can sign up for one for free here. For additional information on how Ethereum transactions work, check out the Ethereum foundation’s information page here.
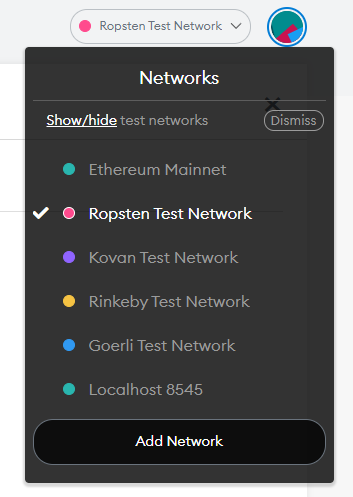
12. Once you have a metamask account, change the network to the ‘Ropsten Test Network’ in the top right corner.
This is so we aren’t dealing with actual currency.
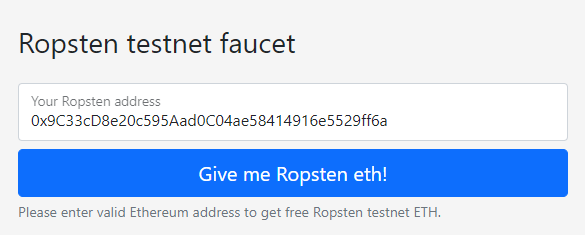
13. Next we’ll need some test currency in our wallet to cover the gas fees for the contract creation.
To do this, we’ll need to go to the Ropsten faucet, enter our wallet address, and click ‘Send Ropsten Eth’.
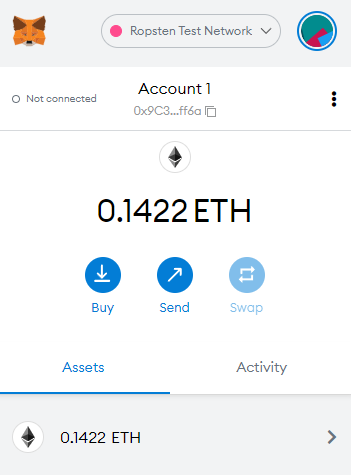
We should see some test currency reflected in our Metamask wallet.
14. Next, let’s initialize our project.
For this, we need to open the command line on our computer and run the following commands:
mkdir my-nft
cd my-nft
These commands make a new folder, also referred to as a directory, then place us inside that directory.
15. Now, we’ll use Node.js and npm for our project.
If you don’t have these installed already, download and install Node.js and npm.
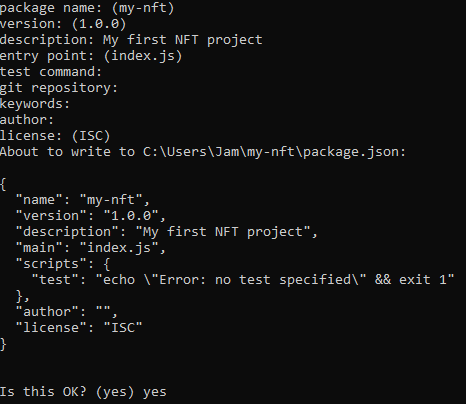
16. Once installed, run the command:
npm init
This will initialize a new npm project in your my-nft directory. This command will output a list of prompts. Here’s how to answer them:
17. Now let’s install Hardhat, a development environment for us to deploy and test our Ethereum app on.
We can install Hardhat with the following command:
npm install --save-dev hardhat
18. Let’s create the Hardhat project now.
Run the following command inside your my-nft directory:
npx hardhat
It should return the following welcome message and menu prompt:

19. From this menu prompt, select ‘Create an empty hardhat.config.js’.
20. Next we’ll create two more folders inside our project directory to help keep it organized as we add more content.
Run the following commands to add a contracts folder and a scripts folder.
mkdir contracts
mkdir scripts
Contracts will be for storing our NFT smart contracts, while scripts will be for storing the code used to mint and deploy our NFT.
21. Now let’s write a piece of code for creating a smart contract.
Open your favorite IDE software and create a new file called MyNFT.sol. Copy and paste the following code into this new file:
//Contract based on https://docs.openzeppelin.com/contracts/3.x/erc721
// SPDX-License-Identifier: MIT

pragma solidity ^0.7.3;

import "@openzeppelin/contracts/token/ERC721/ERC721.sol";
import "@openzeppelin/contracts/utils/Counters.sol";
import "@openzeppelin/contracts/access/Ownable.sol";

contract MyNFT is ERC721, Ownable {
	using Counters for Counters.Counter;
	Counters.Counter private _tokenIds;
	constructor() public ERC721("MyNFT", "NFT") {}
	function mintNFT(address recipient, string memory tokenURI)
		public onlyOwner
		returns (uint256)
	{
		_tokenIds.increment();
		uint256 newItemId = _tokenIds.current();
		_mint(recipient, newItemId);
		_setTokenURI(newItemId, tokenURI);

		return newItemId;
	}
}
This code is based off of the OpenZeppelin library’s ERC721 implementation.
22. Next, install the OpenZeppelin contracts library into the contracts folder. To do this, run the following command:
npm install @openzeppelin/contracts@3.1.0-solc-0.7
23. Now let’s connect Metamask and Alchemy to our NFT project.
Every transaction using your Metamask wallet requires a signature using your Metamask private key. To use our Alchemy app, we need it’s API key. Since we will frequently need both of these keys, we’ll store them in an environment file. To do this, first install the dotenv package into the project directory with the following command:
npm install dotenv --save
24. Then, create a file called .env and add your Alchemy API URL and Metamask private key to this file.
This file must be called .env, otherwise it will not work as expected.
- For instructions on getting your Metamask private key, see here.
- For instructions on how to get your Alchemy API URL, see here.
Your .env file should look similar to this:
PRIVATE_KEY = "your-metamask-private-key"
API_URL = "https://eth-ropsten.alchemyapi.io/v2/your-api-key"
25. Next, install the Ether.js library into your project directory using the following command:
npm install --save-dev @nomiclabs/hardhat-ethers "ethers@^5.0.0"
26. We need to update the hardhat.config.js file to reflect the dependencies we’ve installed.
Update the hardhat.config.js file to reflect the following:
/**
@type import('hardhat/config').HardhatUserConfig
/

require('dotenv').config();
require("@nomiclabs/hardhat-ethers");

const { API_URL, PRIVATE_KEY } = process.env;
module.exports = {
		solidity: "0.7.3",
		defaultNetwork: "ropsten",
		networks: {
			hardhat: {},
			ropsten: {
				url: API_URL,
				accounts: [`0x${PRIVATE_KEY}`]
				}
		},
}
27. Our contract is ready to be compiled. Compile it with the following command:
npx hardhat compile
28. Now we need a deploy script to deploy the contract.
Navigate to the scripts directory we made previously, then create a new file called deploy.js with the following contents:
async function main() {

		// Grab the contract factory
		const MyNFT = await ethers.getContractFactory("MyNFT");

		// Start deployment, returning a promise that resolves to a contract object
		const myNFT = await MyNFT.deploy(); // Instance of the contract
		console.log("Contract deployed to address:", myNFT.address);
}
main()
		.then(() => process.exit(0))
		.catch(error => {
				console.error(error);
				process.exit(1);
});
29. It’s time to deploy our smart contract.
Run the following command to use the deploy.js script:
npx hardhat run scripts/deploy.js --network ropsten
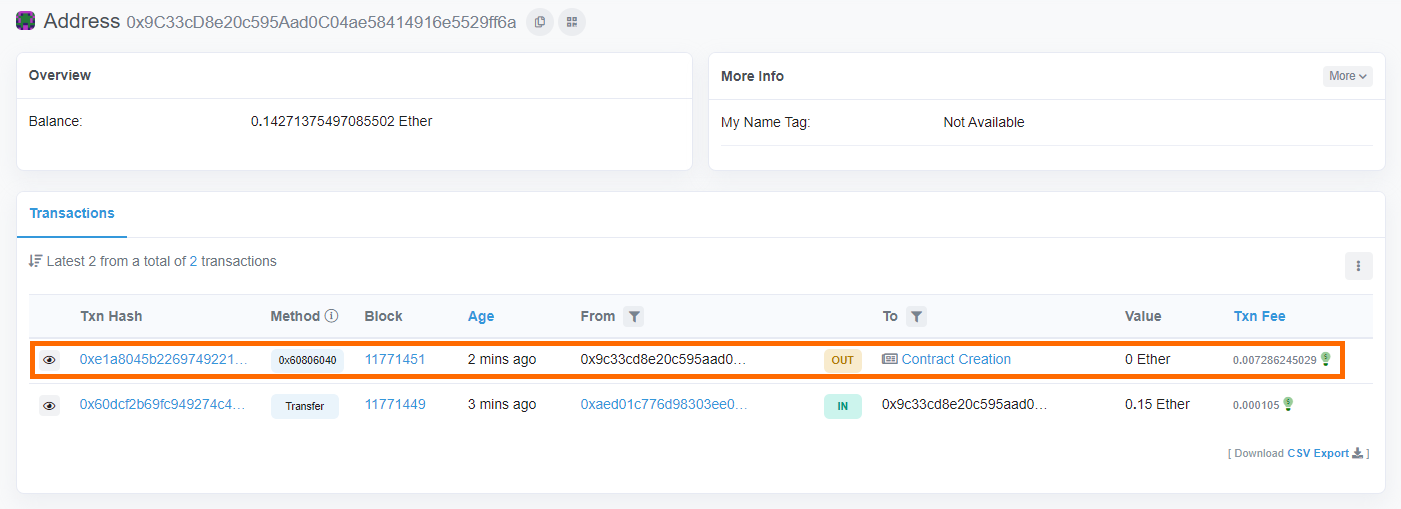
This script will return something resembling the following output:
Contract deployed to address: 0x9C33cD8e20c595Aad0C04ae58414916e5529ff6a
We can confirm this contract creation by going to the Ropsten Etherscan and searching for our wallet address.
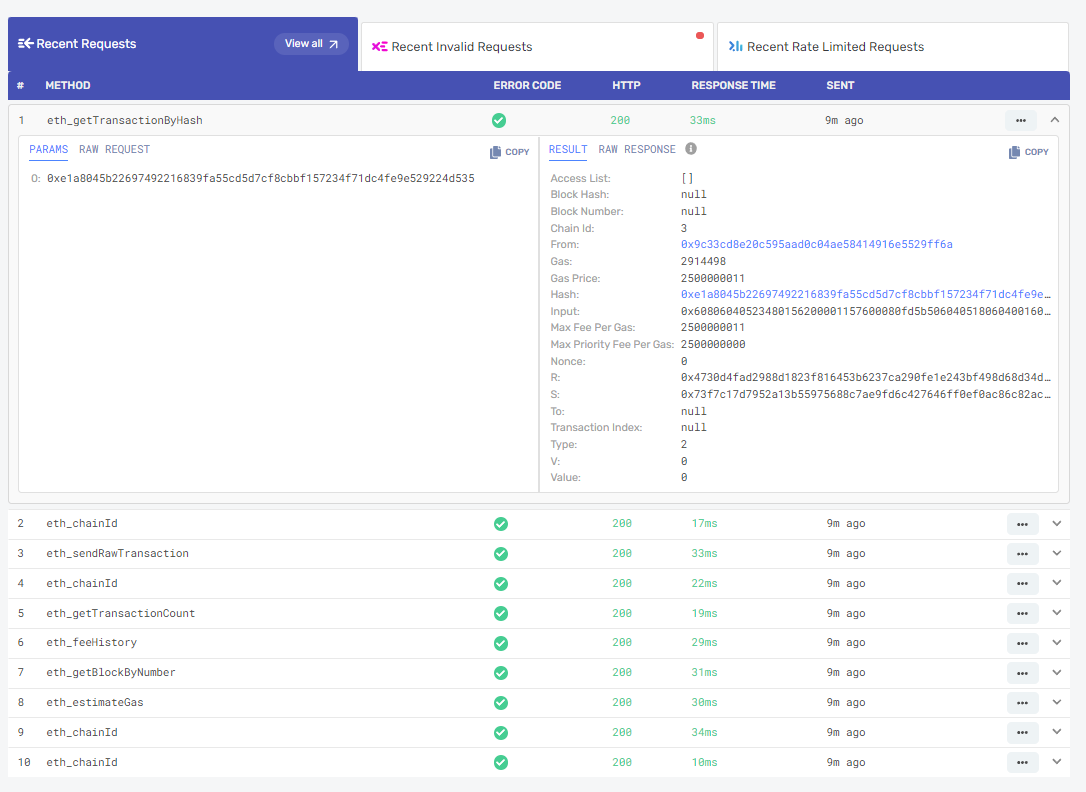
To see what happened on the backend of our deploy script, head over to your Alchemy dashboard and select your NFTs app.
Under the ‘Recent Requests’ tab you’ll see the full listing of the JSON-RPC calls that HardHat made when we used the deploy script.
30. Now that we have deployed a contract, let’s move onto minting the actual NFT.
To do this, first we need to install the Alchemy Web3 library. Install it in your project directory with the following command:
npm install @alch/alchemy-web3
31. Next, create a new file in the scripts directory called mint-nft.js that has the following content:
require('dotenv').config();
const API_URL = process.env.API_URL;
const { createAlchemyWeb3 } = require("@alch/alchemy-web3");
const web3 = createAlchemyWeb3(API_URL);
const contract = require("../artifacts/contracts/MyNFT.sol/MyNFT.json");
32. We need to configure the metadata for our NFT.
The NFT metadata allows for it to have properties such as NFT name, image, description, and other factors like collection and rarity.
In your project root directory, make a new file named nft-metadata.json with the following code:
{
"attributes" : [ {
		"trait_type" : "Breed",
		"value" : "Husky"
}, {
		"trait_type" : "Eye color",
		"value" : "Blue"
} ],
"description" : "A Cute 8-Bit Husky Pup NFT.",
"image" : "https://nft-collection.s3.filebase.com/nft1.png",
"name" : "Husky #1"
}
Replace the ‘image’ url with your Filebase object URL from the beginning of this guide, and configure the other attributes such as trait_type, name, and description to reflect your desired configuration.
33. After you’ve saved the metadata file, upload it to your Filebase bucket following the same process we used to upload the NFT image file at the beginning of this guide.
Copy the object URL and save it for reference later.
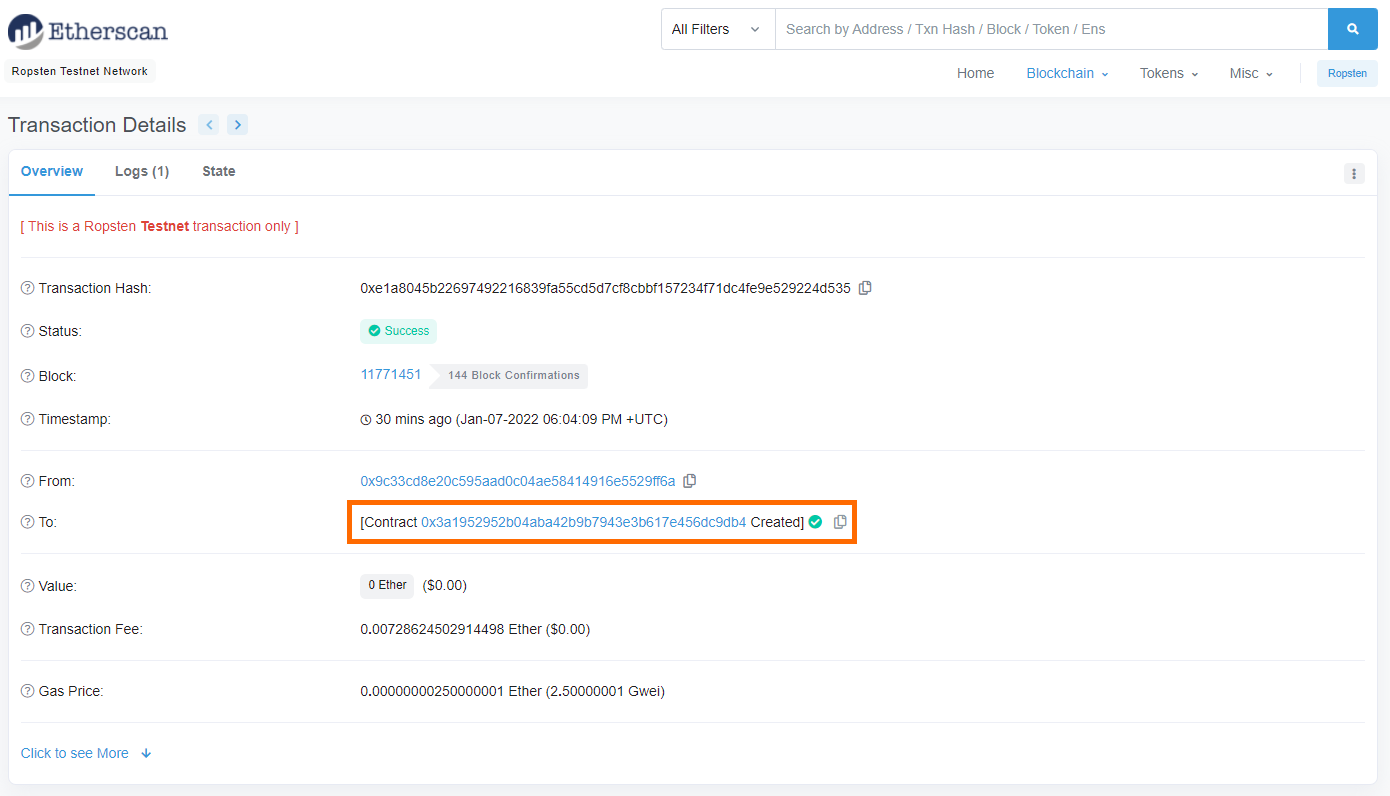
34. Head back to Etherscan where we confirmed that our contract was successfully created and copy down the contract’s address.
If you closed Etherscan, reopen it and search for your wallet address, then click on the transaction for your contract creation.
35. Add the following lines to your mint-nft.js file, replacing the contract address with the address you just copied from Etherscan.
const contractAddress = "0x3a1952952b04aba42b9b7943e3b617e456dc9db4";
const nftContract = new web3.eth.Contract(contract.abi, contractAddress);
36. Open your .env file and add your public Metamask wallet account address to it with the following line:
PUBLIC_KEY = "your-public-account-address"
37. Add the following lines to your mint-nft.js script:
const PRIVATE_KEY = process.env.PRIVATE_KEY;
async function mintNFT(tokenURI) {
const nonce = await web3.eth.getTransactionCount(PUBLIC_KEY, 'latest'); //get latest nonce

//the transaction
const tx = {
'from': PUBLIC_KEY,
'to': contractAddress,
'nonce': nonce,
'gas': 500000,
'maxPriorityFeePerGas': 1999999987,
'data': nftContract.methods.mintNFT(PUBLIC_KEY, tokenURI).encodeABI()
};

const signedTx = await web3.eth.accounts.signTransaction(tx, PRIVATE_KEY);
const transactionReceipt = await web3.eth.sendSignedTransaction(signedTx.rawTransaction);
console.log(`Transaction receipt: ${JSON.stringify(transactionReceipt)}`);
}

mintNFT("https://nft-collection.s3.filebase.com/nft-metadata.json");
These lines add a transaction function, sign the transaction with your private key, and log the transaction receipt. The last line uses the metadata file uploaded to Filebase when minting the NFT.
Overall, your mint-nft.js script should look like the following:
require('dotenv').config();
const API_URL = process.env.API_URL;
const PUBLIC_KEY = process.env.PUBLIC_KEY;
const PRIVATE_KEY = process.env.PRIVATE_KEY;

const { createAlchemyWeb3 } = require("@alch/alchemy-web3");
const web3 = createAlchemyWeb3(API_URL);
const contract = require("../artifacts/contracts/MyNFT.sol/MyNFT.json");
const contractAddress = "0x3a1952952b04aba42b9b7943e3b617e456dc9db4";
const nftContract = new web3.eth.Contract(contract.abi, contractAddress);

async function mintNFT(tokenURI) {
const nonce = await web3.eth.getTransactionCount(PUBLIC_KEY, 'latest'); //get latest nonce

//the transaction
const tx = {
'from': PUBLIC_KEY,
'to': contractAddress,
'nonce': nonce,
'gas': 500000,
'maxPriorityFeePerGas': 1999999987,
'data': nftContract.methods.mintNFT(PUBLIC_KEY, tokenURI).encodeABI()
};

const signedTx = await web3.eth.accounts.signTransaction(tx, PRIVATE_KEY);
const transactionReceipt = await web3.eth.sendSignedTransaction(signedTx.rawTransaction);
console.log(`Transaction receipt: ${JSON.stringify(transactionReceipt)}`);

}

mintNFT("https://nft-collection.s3.filebase.com/nft-metadata.json");
38. Run the mint-nft script to deploy and mint your nft:
node scripts/mint-nft.js
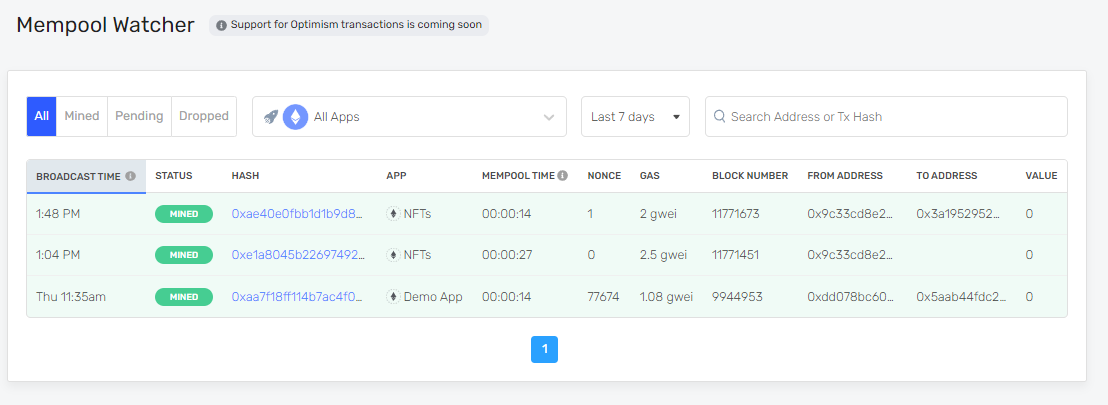
You can confirm your transaction was successful by looking at your Alchemy Mempool and viewing the transaction status. If successful, it should have the status ‘Mined’.
Congratulations, you’ve successfully minted your first NFT! You can use this process to mint as many NFTs as you want! Just remember to use new metadata files for each transaction, otherwise you will create several duplicate NFTs.
Experience the power of Web3 in seconds: Get started with 5GB of free object storage with no expirations and no trials.
Need more storage? Use code "WEB3WELCOME" for 1TB of storage (your first month free) on us! - Sign-up today!